WPF C# Tutorial – Making a Calculator App in Visual Studio
- Subject: WPF C# Tutorials
- Learning Time: 1.5 Hours
With all the buttons been added to the screen now its time to add some events to the buttons. We can directly add the events to the buttons from the XML file.
<Window x:Class="calculations.MainWindow"

xmlns="http://schemas.microsoft.com/winfx/2006/xaml/presentation"

xmlns:x="http://schemas.microsoft.com/winfx/2006/xaml"

xmlns:d="http://schemas.microsoft.com/expression/blend/2008"

xmlns:mc="http://schemas.openxmlformats.org/markup-compatibility/2006"

xmlns:local="clr-namespace:calculations"

mc:Ignorable="d"

Title="WPF Calculations" Height="450" Width="800">

<Grid>

<Label HorizontalAlignment="Center" FontSize="32">WPF Calculations Tutorial</Label>

<TextBox VerticalContentAlignment="Center" TextAlignment="Center" Name="numberA" Margin="224,127,508,266" Width="60" Height="30">00</TextBox>

<TextBox VerticalContentAlignment="Center" TextAlignment="Center" Name="numberB" Margin="490,127,242,266" Width="60" Height="30">00</TextBox>

<Button Width="60" Height="20" Margin="224,278,508,125" Click="AddingNumbers">Add</Button>

<Button Width="60" Height="20" Margin="316,278,416,125" Click="SubtractNumbers">Subtract</Button>

<Button Width="60" Height="20" Margin="404,278,328,125" Click="MultiplyNumbers">Multiply</Button>

<Button Width="60" Height="20" Margin="490,278,242,125" Click="DivideNumbers">Divide</Button>

<Label VerticalAlignment="Bottom" FontSize="32" HorizontalAlignment="Center" Margin="290,0,391,0">Results</Label>

<Label Name="result" VerticalAlignment="Bottom" FontSize="32" HorizontalAlignment="Center" Margin="420,0,328,0" Width="140">00</Label>

</Grid>

</Window>
Time to add some events to the form.
<Button Width=”60″ Height=”20″ Margin=”224,278,508,125″ Click=”AddingNumbers”>Add</Button>
Notice that we have added a new property called Click = “AddingNumbers” inside the button tag. This means when the button will be clicked it will trigger that adding number function.
The other buttons have similar events attached to them. Make sure you have noted them down as you can see here because they are case sensitive.
![]()
To check that our C# script is available to us, see the tab on top right under the tool bar click on the MainWindow.xaml.cs tab and it should open up the c# script that is attached to this app right now.
using System;
using System.Collections.Generic;
using System.Linq;
using System.Text;
using System.Threading.Tasks;
using System.Windows;
using System.Windows.Controls;
using System.Windows.Data;
using System.Windows.Documents;
using System.Windows.Input;
using System.Windows.Media;
using System.Windows.Media.Imaging;
using System.Windows.Navigation;
using System.Windows.Shapes;

namespace calculations
{
    /// <summary>
    /// Interaction logic for MainWindow.xaml
    /// </summary>
    public partial class MainWindow : Window
    {
        public MainWindow()
        {
            InitializeComponent();
        }
    }
}
Above is the empty C# script. All the codes in this script are the default ones and we haven’t added anything new to it yet. So lets start adding all of the events to this. To begin with that go back to the mainWindow.XAML file from the tag and do the following –
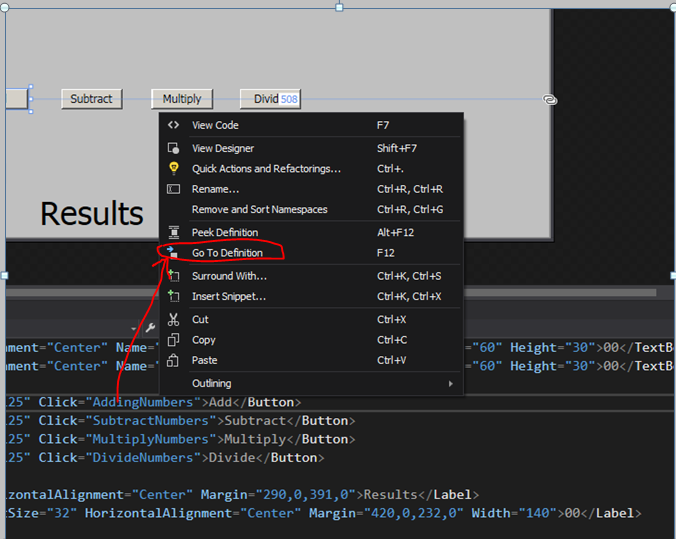
Earlier we added Click events to the buttons, right click on the AddingNumbers text and click on Go to Definition. Once you done that it will add the events to the C# script. Do the same for other events and it will add them.
For some reason it if does not add the events automatically you can type them in there.
using System;
using System.Collections.Generic;
using System.Linq;
using System.Text;
using System.Threading.Tasks;
using System.Windows;
using System.Windows.Controls;
using System.Windows.Data;
using System.Windows.Documents;
using System.Windows.Input;
using System.Windows.Media;
using System.Windows.Media.Imaging;
using System.Windows.Navigation;
using System.Windows.Shapes;

namespace calculations
{
    /// <summary>
    /// Interaction logic for MainWindow.xaml
    /// </summary>
    public partial class MainWindow : Window
    {

        public MainWindow()
        {
            InitializeComponent();

        }

        private void AddingNumbers(object sender, RoutedEventArgs e)
        {

        }

        private void SubtractNumbers(object sender, RoutedEventArgs e)
        {

        }

        private void MultiplyNumbers(object sender, RoutedEventArgs e)
        {

        }

        private void DivideNumbers(object sender, RoutedEventArgs e)
        {

        }
    }
}
In the code above all of the events has been added to the code. Now we will add some crucial code to make this calculator work.
using System;
using System.Collections.Generic;
using System.Linq;
using System.Text;
using System.Threading.Tasks;
using System.Windows;
using System.Windows.Controls;
using System.Windows.Data;
using System.Windows.Documents;
using System.Windows.Input;
using System.Windows.Media;
using System.Windows.Media.Imaging;
using System.Windows.Navigation;
using System.Windows.Shapes;

namespace calculations
{
    /// <summary>
    /// Interaction logic for MainWindow.xaml
    /// </summary>
    public partial class MainWindow : Window
    {

        double num1; // this is double data type number called num1
        double num2; // this is double data type number called num2
        double totalNumber; // this is the double data number called totalNumber this will be used to show the total calculation

        public MainWindow()
        {
            InitializeComponent();

        }

        private void AddingNumbers(object sender, RoutedEventArgs e)
        {

        }

        private void SubtractNumbers(object sender, RoutedEventArgs e)
        {

        }

        private void MultiplyNumbers(object sender, RoutedEventArgs e)
        {

        }

        private void DivideNumbers(object sender, RoutedEventArgs e)
        {

        }
    }
}
First we will need to add 3 public variables. All these variables will be the double data types. The reason we are using double data types is because we can use decimal points. In integers we can only use whole numbers for example 1, 2, 3 or 100 but when we divide numbers they will often return numbers that are 3.4, 7.12 or so on. Integers will not accept decimal numbers therefore we will be using decimal numbers.
private void AddingNumbers(object sender, RoutedEventArgs e)
        {
            num1 = Convert.ToDouble(numberA.Text); // catch the text from the number A text box and convert to a double data type
            num2 = Convert.ToDouble(numberB.Text); // catch the text from the  number B text box and convert to a double data type

            totalNumber = num1 + num2; // add the two numbers together and place them in the total number variable

            result.Content = totalNumber.ToString(); // show the total number on the result label
        }
Above is the adding numbers function. This function will trigger when the add button is clicked. Note – add the green texts are the comments. They are used enhance our understanding of the code.
num1 = Convert.ToDouble(numberA.Text); This line is converting the text from the number A text box into a double data type and storing it inside the num1 variable.
num2 = Convert.ToDouble(numberB.Text); This line is converting the text from the number B text box into a double data type and storing it inside the num2 variable.
We will then use the num1 and num2 to do our calculations. After we have captured the input from both of the text boxes we can use the total number variable and add both num1 and num2 together.
totalNumber = num1 + num2; This line of code will add both num1 and num2 together and store them inside the total number variable.
Finally we need to show the results on the screen. We already have a label called results now we will need to link the total number variable to the results label.
result.Content = totalNumber.ToString(); This line will find the label called result and add the total number content to it. The reason we are using the ToString() end of the total number variable. The to string command means that it will take the values from the total number variable to convert it to string meaning text so we can show it on the form display.
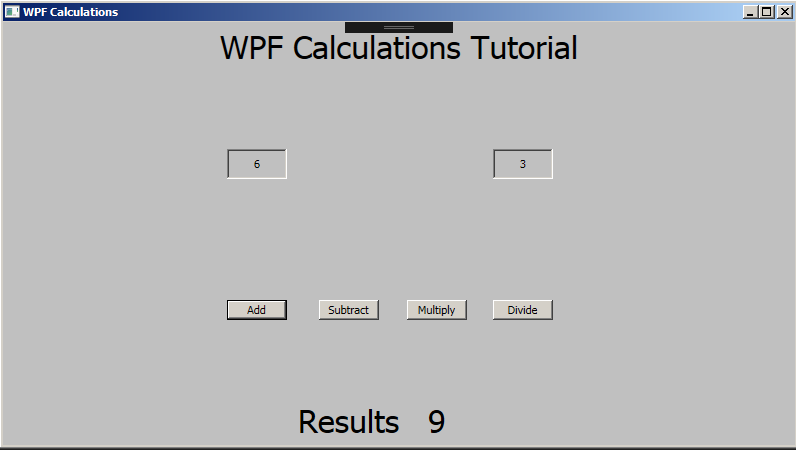
We are adding 6 and 3 together. The results show 9. The adding function is working.
private void SubtractNumbers(object sender, RoutedEventArgs e)

{

       num1 = Convert.ToDouble(numberA.Text); // catch the text from the number A text box and convert to a double data type

       num2 = Convert.ToDouble(numberB.Text); // catch the text from the number B text box and convert to a double data type

       totalNumber = num1 - num2; // substract the two numbers together and place them in the total number variable

       result.Content = totalNumber.ToString(); // show the total number on the result label

}
Above is the subtract numbers function. This function will trigger when the Subtract button is clicked. You will notice it is very similar to the function we did before. The only different is this line below –
totalNumber = num1 – num2; // substract the two numbers together and place them in the total number variable
The total number is now subtracting num1 and num2. We are using the minus sign instead of the plus sign in this code. The rest of the code is the same.
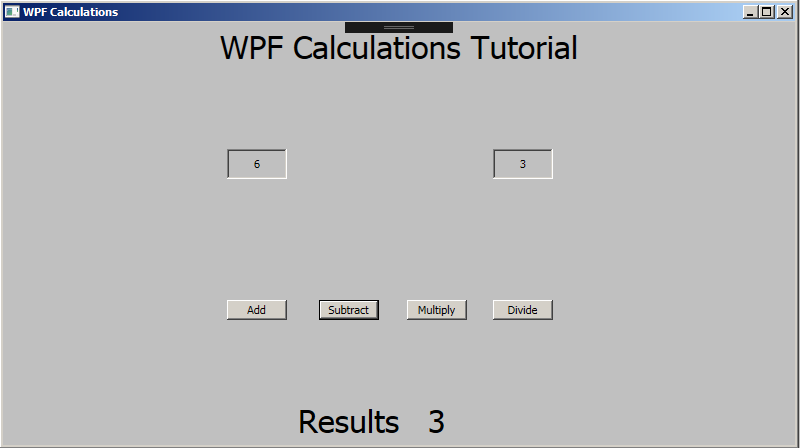
We are subtracting 6-3 and the result is showing 3.
        private void MultiplyNumbers(object sender, RoutedEventArgs e)
        {
            num1 = Convert.ToDouble(numberA.Text); // catch the text from the number A text box and convert to a double data type
            num2 = Convert.ToDouble(numberB.Text); // catch the text from the  number B text box and convert to a double data type

            totalNumber = num1 * num2; // multiply the two numbers together and place them in the total number variable

            result.Content = totalNumber.ToString(); // show the total number on the result label
        }
Above is the multiply numbers function. Once again it is the same as the ones before except for the arithmetic symbols.
totalNumber = num1 * num2; // multiply the two numbers together and place them in the total number variable
The total number is now multiplying the two numbers together notice that we are using a asterisk symbol to complete the multiplication for this task.
Rest of the code can stay the same.
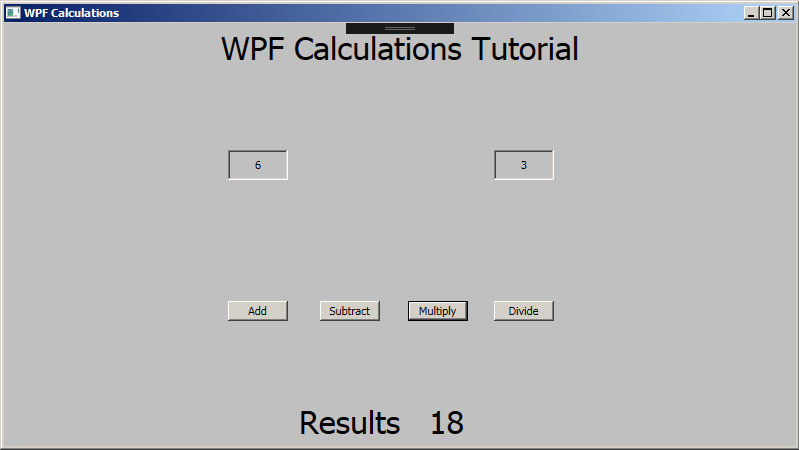
We are multiplying 6 X 3 and result is 18.
       private void DivideNumbers(object sender, RoutedEventArgs e)
        {
            num1 = Convert.ToDouble(numberA.Text); // catch the text from the number A text box and convert to a double data type
            num2 = Convert.ToDouble(numberB.Text); // catch the text from the  number B text box and convert to a double data type

            totalNumber = num1 / num2; // divide the two numbers together and place them in the total number variable

            totalNumber = Math.Round(totalNumber, 2); // round the numbers down 2 decimal points

            result.Content = totalNumber.ToString(); // show the total number on the result label
        }
Above is the divide numbers function. For this function we kept most of the code similar to the last 3 functions except for two difference. The first different is the symbol for divide we are using slash symbol for the division.
totalNumber = num1 / num2; // divide the two numbers together and place them in the total number variable
Since division usually can generate decimal point numbers our answers might return something line 7.3333333 or bigger we need round down the numbers to maximum two decimal points.
totalNumber = Math.Round(totalNumber, 2); // round the numbers down 2 decimal points
The line above is using the Math.Round function which will take the total number variable and round it down to 2 decimal points and store it back into the total number variable.
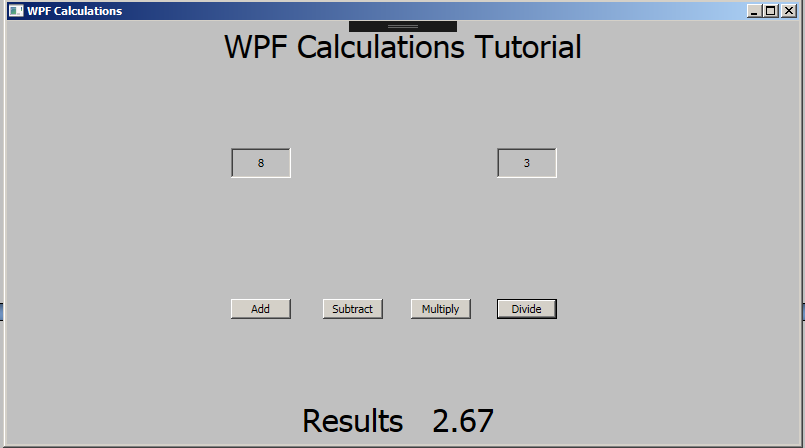
Now finally we are dividing 8 / 3, the result is showing 2.67 there would have been more decimal points but we are rounding the decimal points down to 2 maximum. So all that works. Well done.
That will be all for this calculator app. Well done you’ve followed this tutorial so far.
How I need to change (NumberA.Text), (NumberB.Text) and whereat?
Hi, Thank you for bringing to my attention, there was a small spelling error which led to the numberA and numberB texboxes not being recognised. I have fixed that now in the source code. Both of them are the text boxes you add to the xaml file and then we call them to capture the input from them to do the calculations.