WPF C# Tutorial – Create a Flappy Bird Game in Visual Studio
- Subject: WPF C# Tutorials
- Learning Time: 2 hours
Code the main game engine event for Flappy Bird Game in WPF C#
This is the biggest event for this game because it holds all of the logic for the image components in this game. Everything from movement, score, miss, game over, collision and animation are controlled through this function. its very important that you slowly type the code up because if you simply copy and paste it you will lose the chance to gain a better understanding of the actions this event is taking. Lets dig in to it.
Below is the full code for the game engine event.
private void gameEngine(object sender, EventArgs e)
        {
            // this is the game engine event linked to the timer

            // first update the score text label with the score integer
            scoreText.Content = "Score: " + score;

            // link the flappy bird image to the flappy rect class
            FlappyRect = new Rect(Canvas.GetLeft(flappyBird), Canvas.GetTop(flappyBird), flappyBird.Width -12, flappyBird.Height - 6);

            // set the gravity to the flappy bird image in the canvas
            Canvas.SetTop(flappyBird, Canvas.GetTop(flappyBird) + gravity);

            // check if the bird has either gone off the screen from top or bottom
            if (Canvas.GetTop(flappyBird) + flappyBird.Height > 490 || Canvas.GetTop(flappyBird) < -30)
            {
                // if it has then we end the game and show the reset game text
                gameTimer.Stop();
                gameover = true;
                scoreText.Content += "   Press R to Try Again";
            }

            // below is the main loop, this loop will go through each image in the canvas
            // if it finds any image with the tags and follow the instructions with them

            foreach (var x in MyCanvas.Children.OfType<Image>())
            {
                if ((string)x.Tag == "obs1" || (string)x.Tag == "obs2" || (string)x.Tag == "obs3")
                {

                    // if we found an image with the tag obs1,2 or 3 then we will move it towards left of the scree

                    Canvas.SetLeft(x, Canvas.GetLeft(x) - 5);

                    // create a new rect called pillars and link the rectangles to it
                    Rect pillars = new Rect(Canvas.GetLeft(x), Canvas.GetTop(x), x.Width, x.Height);

                    // if the flappy rect and the pillars rect collide
                    if (FlappyRect.IntersectsWith(pillars))
                    {
                        // stop the timer, set the game over to true and show the reset text
                        gameTimer.Stop();
                        gameover = true;
                        scoreText.Content += "   Press R to Try Again";
                    }

                }

                // if the first layer of pipes leave the scene and go to -100 pixels from the left
                // we need to reset the pipe to come back again
                if ((string)x.Tag == "obs1" && Canvas.GetLeft(x) < -100)
                {
                    // reset the pipe to 800 pixels
                    Canvas.SetLeft(x, 800);
                    // add 1 to the score
                    score = score + .5;

                }
                // if the second layer of pipes leave the scene and go to -200 pixels from the left
                if ((string)x.Tag == "obs2" && Canvas.GetLeft(x) < -200)
                {
                    // we set that pipe to 800 pixels
                    Canvas.SetLeft(x, 800);
                    // add 1 to the score
                    score = score + .5;
                }
                // if the third layer of pipes leave the scene and go to -250 pixels from the left
                if ((string)x.Tag == "obs3" && Canvas.GetLeft(x) < -250)
                {
                    // we set the pipe to 800 pixels
                    Canvas.SetLeft(x, 800);
                    // add 1 to the score
                    score = score + .5;

                }

                // if find any of the images with the clouds tag on it
                if ((string)x.Tag == "clouds")
                {
                    // then we will slowly move the cloud towards left of the screen
                    Canvas.SetLeft(x, Canvas.GetLeft(x) - .6);


                    // if the clouds have reached -220 pixels then we will reset it
                    if (Canvas.GetLeft(x) < -220)
                    {
                        // reset the cloud images to 550 pixels
                        Canvas.SetLeft(x, 550);
                    }
                }
            }
        }
Lets break down this event and see how it works.
scoreText.Content = “Score: ” + score;
This line above is linking the score text label we created earlier in the canvas. Inside it we are showing the text score in quote marks and plus link to the score integer. Because the timer is being updated constantly its beneficial to have it inside the timer event so when the score changes we can see it straight away.
FlappyRect = new Rect(Canvas.GetLeft(flappyBird), Canvas.GetTop(flappyBird), flappyBird.Width -12, flappyBird.Height - 6);
This line is code above is setting up the Flappy RECT to the flappy bird image. We need to check for collisions. Inside the new RECT construct we are giving all the values of the flappy bird image for example the left position, the top position, height and width. You will notice that we are deducting from value from the width and height of the bird image. The reason behind it is that the transparent image we are using for this game has some empty areas around it. We don’t want the players to think the game is cheating to lose so we are deducting some areas from the images to make this HIT BOX around it. This way we can make sure that when the player hit the pipe, THEY REALLY DID HIT THE PIPE.
Canvas.SetTop(flappyBird, Canvas.GetTop(flappyBird) + gravity);
Link the gravity integer to the flappy bird image. With the gravity being added to the bird’s top position it will always pull the bird down. Unless the space key is pressed when the gravity becomes negative then it will by pushed up the screen.
if (Canvas.GetTop(flappyBird) + flappyBird.Height > 490 || Canvas.GetTop(flappyBird) < -30)
{
// if it has then we end the game and show the reset game text
gameTimer.Stop();
gameover = true;
scoreText.Content += "   Press R to Try Again";
}
This is statement above is checking if the bird has gone beyond the game boundaries for example if the flappy bird image has gone beyond 490 pixels from bottom of the screen then we can assume the player cannot see the bird any so we can stop the timer, change the game over Boolean to false and show the press R to try again text on the score text label. The reason we are using the += sign next to the label is because we don’t want to override the current content inside this label, we want this text to show right next to them that’s why we have lots of spaces before the content starts inside the quotation marks. The same actions will be taken if the object leaves the screen from the top. Inside the if conditions we can check for multiple conditions by using the 2 pipes || symbols which are placed above the forward slash button on a UK layout keyboard. This means OR in if conditions so we want check if the bird has dropped below the boundary OR it flew above the boundary if any of these conditions are true then we can action the instructions inside the if statements logic.
foreach (var x in MyCanvas.Children.OfType<Image>())
this is the main game loop using the for each loop and searching for types of image in the canvas. This for loop will help us control all of the pipes and the clouds in this game. Good thing is that we don’t have to add or remove anything dynamically from this game so it will be straight forward to understand what this loop is doing in the app.
X variable will save all of the images it finds in it so we can check if X meets our requirements then we can tell it to complete different actions in the game.
Checking conditions of the X variable –
                if ((string)x.Tag == "obs1" || (string)x.Tag == "obs2" || (string)x.Tag == "obs3")
                {

                    // if we found an image with the tag obs1,2 or 3 then we will move it towards left of the scree

                    Canvas.SetLeft(x, Canvas.GetLeft(x) - 5);

                    // create a new rect called pillars and link the rectangles to it
                    Rect pillars = new Rect(Canvas.GetLeft(x), Canvas.GetTop(x), x.Width, x.Height);

                    // if the flappy rect and the pillars rect collide
                    if (FlappyRect.IntersectsWith(pillars))
                    {
                        // stop the timer, set the game over to true and show the reset text
                        gameTimer.Stop();
                        gameover = true;
                        scoreText.Content += "   Press R to Try Again";
                    }

                }
In this if statement we are checking IF X has a tag and that tag contains obs1 OR obs2 OR obs3
Then we can move those images with the tags toward left of the screen. Canvas.SetLeft(x, Canvas.GetLeft(x) – 5); this line will move the pipe images 5 pixels to the left every frame. That’s why we are using the -5 calculations for this game.
Rect Pillars line may look familiar to you as we have created a flappy rect earlier in the code. This line will create a new HIT BOX to go around the pipes in the game. Instead of manually creating them for each pipe in the game we are working with the for each loop and doing it more dynamically.
Once the hit box is set now, we can check for collision between the flappy bird and the pipes. The line if (FlappyRect.IntersectsWith(pillars)) in the start of the condition that is checking if the flappy bird hit box and touched the pipes hit box. If they are overlapping in any way then we can stop the main game timer, change game over to true and show the press R to restart text.
When the pipes move to left of the screen, we also need to make sure that they come back to their original place on the right and then get them to move again. The following if statement checks and then resets the pipe as they exit the boundary from the left.
                // if the first layer of pipes leave the scene and go to -100 pixels from the left
                // we need to reset the pipe to come back again
                if ((string)x.Tag == "obs1" && Canvas.GetLeft(x) < -100)
                {
                    // reset the pipe to 800 pixels
                    Canvas.SetLeft(x, 800);
                    // add 1 to the score
                    score = score + .5;

                }
                // if the second layer of pipes leave the scene and go to -200 pixels from the left
                if ((string)x.Tag == "obs2" && Canvas.GetLeft(x) < -200)
                {
                    // we set that pipe to 800 pixels
                    Canvas.SetLeft(x, 800);
                    // add 1 to the score
                    score = score + .5;
                }
                // if the third layer of pipes leave the scene and go to -250 pixels from the left
                if ((string)x.Tag == "obs3" && Canvas.GetLeft(x) < -250)
                {
                    // we set the pipe to 800 pixels
                    Canvas.SetLeft(x, 800);
                    // add 1 to the score
                    score = score + .5;

                }
Above we have 3 different if statements each of them is checking the 3 obstacle groups we have for this game. Inside the if statement we are checking the tag first and then we check if that item has left the screen from the left. For obs1 we check if it has gone passed -100 pixels from left of the screen, if this condition is true then we move the pipe to 800 pixels location and add .5 to the score. The reason we are adding .5 to the score if because there are two pipes in each group, this loop checks for each pipe as one not as a group so since we have two of them, we need to divide the score points between them and then add it to the main scoring. Each group of pipes pass the player means the player are successfully avoided the pipes so we can give them .5 X 2 = 1 for each successful escape. Remember we set the score variable as a double beginning of the game, this is the reason we did that.
Clouds animation and placement –
                // if find any of the images with the clouds tag on it
                if ((string)x.Tag == "clouds")
                {
                    // then we will slowly move the cloud towards left of the screen
                    Canvas.SetLeft(x, Canvas.GetLeft(x) - .6);

                    // if the clouds have reached -220 pixels then we will reset it
                    if (Canvas.GetLeft(x) < -220)
                    {
                        // reset the cloud images to 550 pixels
                        Canvas.SetLeft(x, 550);
                    }
                }
In the if statement above we are checking if any of the X has a tag of clouds if it does, we move the cloud .6 pixels to the right, this gives us the slow animation and makes it look like the parallax effect where the background is moving slower than the foreground. WE have another if statement inside of it, this one is checking if the cloud object has gone passed the boundary passed -220 pixels. If this condition is true then we can move the clouds back to 550 pixels to the right of the screen.
That’s the full tutorial for the flappy bird game in WPF C# and Visual studio. If you have followed the tutorial so far and your game is working then very well done, if not please check where you are stuck or ask a question in the comments.
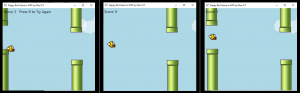
Now debug or run the app in visual studio and you should be able to see what it looks like when the program has compiled it.
Go to the Full Source Code page to see the full C# script for this game.
Thank you very much from Russia! You are amazing web-teacher!) I loved it!
I had some trouble because I named my project something else, but once I fixed that it worked great! Great tutorial!