WPF C# Tutorial – Make a Hello MOO (Hello World) Program in Visual Studio
- Subject: WPF C# Tutorials
- Learning Time: 1 hour
Start Coding
This is the view of the program so far. Now we can start adding some events to the application.

When you first open the program, it should have the CS file open however if it did not open it then you can double click it from the solutions explorer.
using System;
using System.Collections.Generic;
using System.Linq;
using System.Text;
using System.Threading.Tasks;
using System.Windows;
using System.Windows.Controls;
using System.Windows.Data;
using System.Windows.Documents;
using System.Windows.Input;
using System.Windows.Media;
using System.Windows.Media.Imaging;
using System.Windows.Navigation;
using System.Windows.Shapes;

namespace hello_WPF
{
///<summary>
/// Interaction logic for MainWindow.xaml
///</summary>
    public partial class MainWindow : Window
    {
        public MainWindow()
            {
                InitializeComponent();
            }
    }
}
This is the default view of our C# file in this application. This is the empty one for now we will start adding our own functions.
First thing to do is lets go back to the XML file and add some quick tags.
<Windowx:Class="hello_WPF.MainWindow"
xmlns="http://schemas.microsoft.com/winfx/2006/xaml/presentation"
xmlns:x="http://schemas.microsoft.com/winfx/2006/xaml"
xmlns:d="http://schemas.microsoft.com/expression/blend/2008"
xmlns:mc="http://schemas.openxmlformats.org/markup-compatibility/2006"
xmlns:local="clr-namespace:hello_WPF"
mc:Ignorable="d"
Title="MainWindow" Background="Black" Height="350" Width="525">
<Grid>

<Button VerticalAlignment="Bottom" Height="20" Width="200" Content="Click ME" FontWeight="Bold" Click="Button_MouseDown">

</Button>

<TextBlock Name="hi" HorizontalAlignment="Center" VerticalAlignment="Center" FontSize="72" Foreground="Yellow">

Hello, MOO!

</TextBlock>

</Grid>

</Window>
Inside the button tag please add the following line Click=”Button_MouseDown”. See the example above. This tag we added here will add a click event to the button. After you have typed it up you can right click on it and click on go to definition

This will automatically create a event for this in the c# window. For now come back and inside the text block tag add the following tag Name=”hi”. See the example above.
The idea is we will link the button to the text block using c#.
using System;
using System.Collections.Generic;
using System.Linq;
using System.Text;
using System.Threading.Tasks;
using System.Windows;
using System.Windows.Controls;
using System.Windows.Data;
using System.Windows.Documents;
using System.Windows.Input;
using System.Windows.Media;
using System.Windows.Media.Imaging;
using System.Windows.Navigation;
using System.Windows.Shapes;

namespace hello_WPF
{
///<summary>
/// Interaction logic for MainWindow.xaml
///</summary>
public partial class MainWindow : Window
    {
        public MainWindow()
        {
            InitializeComponent();
        }

        private void Button_MouseDown(object sender, RoutedEventArgs e)
        {
            MessageBox.Show("You Clicked the button");
            hi.Text = "You Clicked WOOP!!";
            hi.FontSize = 32;
        }
    }
}
So this is the button mouse down event we added earlier. Inset the code from inside it to your. The code line is creating a message box with the message you clicked the button, then we will change text of the text block to you clicked WOOP now notice we can call the text block hi because we have given it a name in the last example. By giving elements names it makes it easier to manage them in the code and as your program gets bigger you might want to give each element unique names so it becomes more manageable.
After the message box comes up the program will look for hi text box and change its text to “you clicked Woop!!” and then change its font size to 32 pixels.
Lets debug the program by clicking on the start button from the tool bar. ![]()

This is the screen shots of event working so far.
You are also able to add different types of events to any component. Lets add two more events to our program. We want to change the colour of the text when the mouse is over it and change it again when the mouse leaves the text block.
<Window x:Class="hello_WPF.MainWindow"

xmlns="http://schemas.microsoft.com/winfx/2006/xaml/presentation"

xmlns:x="http://schemas.microsoft.com/winfx/2006/xaml"

xmlns:d="http://schemas.microsoft.com/expression/blend/2008"

xmlns:mc="http://schemas.openxmlformats.org/markup-compatibility/2006"

xmlns:local="clr-namespace:hello_WPF"

mc:Ignorable="d"

Title="MainWindow" Background="Black" Height="350" Width="525">

<Grid>

<Button Name="button1" VerticalAlignment="Bottom" Height="20" Width="200" Content="Click ME" FontWeight="Bold" Click="Button_MouseDown">

</Button>

<TextBlock Name="hi" HorizontalAlignment="Center" VerticalAlignment="Center" FontSize="72" Foreground="Yellow" MouseEnter="changeColor" MouseLeave="changeColorAgain">

Hello, MOO!

</TextBlock>

</Grid>

</Window>
Inside the text block tag the MouseEnter=”changeColor” MouseLeave=”changeColorAgain” tags. Once again right click on both and click on go to Definition to create the events automatically. Off course it is doesn’t do it for you then you can type it up yourself all the examples are here.
using System;
using System.Collections.Generic;
using System.Linq;
using System.Text;
using System.Threading.Tasks;
using System.Windows;
using System.Windows.Controls;
using System.Windows.Data;
using System.Windows.Documents;
using System.Windows.Input;
using System.Windows.Media;
using System.Windows.Media.Imaging;
using System.Windows.Navigation;
using System.Windows.Shapes;

namespace hello_WPF
{
///<summary>
/// Interaction logic for MainWindow.xaml
///</summary>

public partial class MainWindow : Window
{
        public MainWindow()
        {
            InitializeComponent();
        }

        private void Button_MouseDown(object sender, RoutedEventArgs e)
        {
            MessageBox.Show("You Clicked the button");
            hi.Text = "You Clicked WOOP!!";
            hi.FontSize = 32;
        }

        private void changeColorAgain(object sender, MouseEventArgs e)
        {
            hi.Foreground = Brushes.Red;
        }

        private void changeColor(object sender, MouseEventArgs e)
        {
            hi.Foreground = Brushes.Yellow;
        }
    }
}
Here we are so the change colour function will change the font colour to yellow when the mouse is over the text box and change colour again function to change the font colour to red when the mouse cursor leaves the text block. Lets try it out. Click on the start button to run the program. ![]()
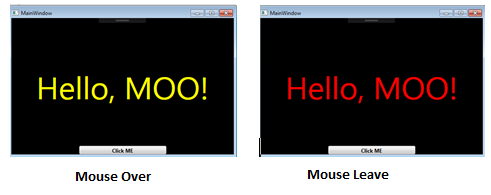
Here we go the program is working as intended. Since this is our first WPF tutorial we want to cover some basics and some interesting things you can do with WPF. Now its your turn to add your own elements and add interactivity with them from this program.
Have fun.
Moo Out.